Installation guide
On this page you will find a guide to help you install BetterGeo. Installing mods for games can often be a bit tricky, and Minecraft is no exception. With these 6 steps and figures the installation gets simpler.
Further down you can find how to install special maps and features you will need for certain exercises and lectures.
BetterGeo requires you to have the Java version of Minecraft installed on your computer. You can find it on minecraft.net.
Step 1: Start Minecraft
Before you install the mod manager tool called Forge, you need to start the right version of Minecraft. First, start the Minecraft Launcher. Press “Minecraft: Java Edition” and then the “Installations”-tab. Create a new installation by clicking “+New”. Write a name and choose the version "release 1.7.10”. Go back to the “Play”-tab and then choose the installation you just created in the menu to the left of the Play-button. Start the installation once to download the appropriate files. Close down Minecraft before moving to the next step.
Step 2: Download Forge
Start by downloading the mod management tool Minecraft Forge. Forge makes it possible to use mods with Minecraft and is required to play BetterGeo. BetterGeo uses the version 1.7.10, you will need to download the same version of Forge. You will find Forge through the link below:
https://files.minecraftforge.net/maven/net/minecraftforge/forge/index_1.7.10.html
Follow the link and download "Installer" from the "Download Recommended" tab. You might get a popup with advertisement, just click "Skip" in the top right corner.
Step 3: Install Forge
When you downloaded the installer you need to open it.
N.B: If you don't have Java installed on your computer you might get a popup prompting you to download Java. Follow the link and download Java. Java is required to run Minecraft and BetterGeo. When you've installed Java, open the Forge installer again.
The Forge installer will give you three choices: Install client, Install server and Extract. Choose Install client. Forge will install, when it's done you will get a prompt that it's done, click OK.
Step 4: Start Forge
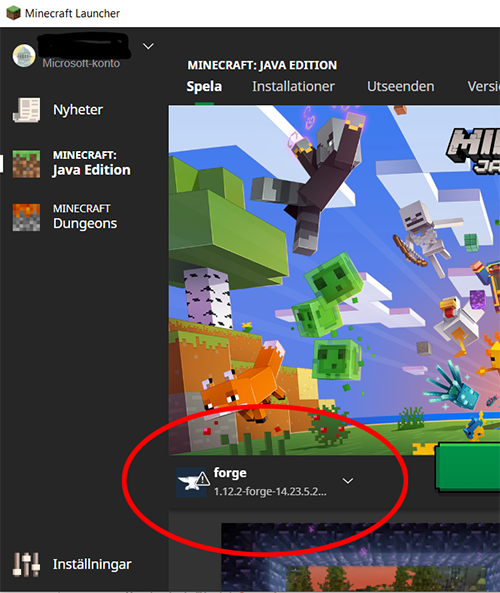
Before you install BetterGeo or other mods you need to open up Minecraft (with Forge) once. This is done by starting Minecraft and clicking on the profile "Forge" as seen in the figure to the right (make sure that the small text under the title is specified for 1.7.10-Forge). When the profile for Forge is active, click "Play". Minecraft will install some more files, then star.
When Minecraft has started you can close it again to complete the rest of the steps.
Step 5: Download BetterGeo
To download BetterGeo you need to follow the link below:
https://www.curseforge.com/minecraft/mc-mods/bettergeo/files/3490653
To install BetterGeo you will need to put the file you just downloaded in the right folder. Follow the next step to learn how.
Step 6: Find the folder for Minecraft
To install mods to Minecraft you will need to reach the folder where Minecraft is installed. This is most easily done by using the tool "Run" in Windows. Search for "Run" or use the keyboard command by pressing the Windows button and R at the same time.
In Run you write: %appdata%/.minecraft
Press OK. The folder for Minecraft is opened.
Step 7: Install BetterGeo
The BetterGeo file you downloaded in step 5 needs to be put in the "mods" folder that is in the folder you opened in step 6. Paste the file in the folder "mods".
You can now start Minecraft again in same way as in step 3. If you create a new world it will use BetterGeo!
Install extra features
Install ResetMap-mod
The ResetMap mod is a good mod that makes you able to start a game from a special save several times. The mod is recommended for all lectures and exercises on BetterGeoEdu.
To download the mod follow the link below:
https://www.curseforge.com/minecraft/mc-mods/hardcore-map-reset/files/2248866
Press "Download" and put the file in the "mods" folder in the same way as in step 6 above. Another folder will be created the first time you start the game with the ResetMap mod. This folder is called "maps" (see figure to the right). In this folder you can put maps and saves you will need for lectures and exercises you find on BetterGeoEdu.
To reach the maps and saves you put in the "maps" folder you need to start Minecraft and click Singleplayer. Choose "Create Frome Template" in the lower right corner (see figure).
The "Create From Templete" button takes you to a menu where you can choose a map or save you want to play. Choose one, write a name and click "Create New World". You will then start the game from that special save point in the game. When you save your game you will get a seperate save file, found through the menu directly under "Singleplayer". You can always restart a lecture or exercise by going in to "Create From Template" again.


